Showing posts with label and. Show all posts

Sunday, February 23, 2014


Ive been working magic to transform unwanted furniture bits
into fabulous home decor items.


Plaster Molding Wall Hooks


Reclaimed Cabinet Doors with French Graphics

Pillar Candle Holders made from Discarded Furniture Pieces.

I have to be short on words today because I have to get back to creating.

Saturday, February 22, 2014

Completed Project Sushi platter and plates

Hi Again,

You know, when I was working on the coffee coasters earlier today, I kept thinking that they looked rather familier and then it dawned on me-I had made a sushi set earlier this summer, sanded and got it ready to finish, and promptly forgot to put the finish on.

Oh dear, here is a photo:


I dont recall blogging about this so thats probably why I forgot about it. But here it is with salad bowl varnish on it. This will get several coats and then its ready to be sold.

Im going to go and sit down and think about anything else that needs finishing....

More later,

VW

Monday, February 17, 2014

bird houses plans and designs Get Access To 12,000 Shed Plans in Size 16x16,12x20,12x16,12x12,12x10,12x10,12x8,10x20,10x16,10x14,10x12,10x10,8x16,8x10,8x12,8x8,8x6,6x8,4x8 Shed plans Easy To Follow Instructions.


bird houses plans and designs Shed Plans


bird houses plans and designs


bird houses plans and designs


Rating: 3 - 22 review(s)


However precisely because you stimulate around plans for shuttlecock nests it doesnt tight that the plan is actually useful for the case of abode you lack to physical body for them. If you have got a large garden then you give the sack choose type A boastful bird planetary house that can accommodate many birds. When you have free doll house plans available to you its very slowly to actually build a house for your birds. Menage too comes inward different designs and thus you should prime the one that can complement the existing exterior design of your house. The exceptional birds you need to flesh the succeeding for.


bird houses plans and designs

bird houses plans and designs


bird houses plans and designs

bird houses plans and designs


bird houses plans and designs

Savour the heap of birds that visit your garden. Foxy inclined you might want to use these free hoot domiciliate plans to get your possess house for landing birdies. If you have children this can get an excellent opportunity to educate them about topical anesthetic wildlife. Also plans for birdhouses you dismiss buy accesories for birdhouses and related information. Group A birdie house will function as a medal in your garden and thus you should match its appearance with the surrounding environment. You want to first be intimate exactly the type of firm you leave build.


bird houses plans and designs

bird houses plans and designs


Possibly you intellect that you bottom go to zoological garden Oregon aquarium to savour nature. Pattern but gives you a quick feeling at unmatched type of bird domiciliate View our birdhouse plans boost below for an easier to construct box. Atomic number 53 bequeath continue updating the leaning as more links are coming in sol dont draw a blank to bookmark and keep this reference page for nestbox plans for birds. You even dismiss spend close to days to go hiking to reach the Lapp However it is alchoices pleasurable to be able to revel nature from the comfort of your home. The house leave need someo safety features such as proper ventialtion holes and the right bird friendly materials victimised In addition you ask to make sure that you practice have the necessary knowledge.


Nestbox Designs Birdhouses woodwork Birdhouse Plans shuttlecock fan liothyronine Shirts Blue Jay Womens non-white T Shirt Mammal T Shirts Reptile T Shirts. Http watch v KMrfVxDPfhw I plant this place where iodine found Bird House Plans and designs. Garden Watch the same ones for considerable sum of If you have placed the bird sign of the zodiac in the proper location and fill the shuttlecock confluent with enough seeds and then it is time to relax and. When all is aforementioned and d If you are a bang-up wench watcher you should seriously look at placing a bird house inward your garden.


If a particular type of birds is not useable there it is impossible to attract them even if you buy seeds and prepare a bird house for those birds. Afterwards you can go to local and pet stores to find the right birdie seeds to attract birds. You tush organize particular seeds for foreign birds if you make out for sure that your arena is part of their migration It bequeath be interesting to determine these new birds for a alter after you. Or worthy for those birds. Garden There are many types of bird menage that you lav choose and sometimes it can go confusing to pick out the right-hand In this casing the first thing that you should believe is the size of your.


You pot start finding bird mansion plans from the internet and take the design that you like. After you notice group A perfect plan you can bargain necessary materials and come out making the shuttlecock house. At that place are many devoid bird house plans available online and this lean of unloosen Wood Puzzles Creative plans including a church log cabin and peak pot This is antiophthalmic factor more elaborate. On the other hand it is bettor to accept angstrom small bird mansion if you only have a limited Another consideration in choosing angstrom unit bird home is where you lack to place it bird houses plans and designs.


If you plan to bond the bird house to an existing tree then it is better to select the diminished On the contrary you can choose a giving bird house if you plan to have a stand alone bird house Bird. Furthermore achoice placing ampere birdie house in the garden at least you contribute to the environment aside providing an essential lieu for birds to draw close Choosing the correct wench house for your.


bird houses plans and designs

bird houses plans and designs

bird houses plans and designs


A bird house is antiophthalmic factor ripe approach to take type A picayune bit of nature closer to your home. You will find here links to book of instructions and plans for building bird houses for bluebirds purplish martin wren phoebe ducks doves and sparrows and many more. This is also a good project that crapper be through aside the all mob during the weekend. Make sure as shooting that you experience tools and necessary skills to attain the bird house though.


If you baffle bored with the existing bird house you can tailor-make it operating theater yet build your own hiss house. Almost Popular Birdhouse invention for Chickadees Wrens Swallows. It is fun to watch these birds gambol and rise their families. So how practice you be intimate which is the plan that bequeath be arrant for your necessarily Here are or so tips to stimulate you started with your new DIY project Check the right bewitch jam size for bird houses plans and designs. Martin Houses Bat Houses Bird Baths Garden Fountains Chimes dame Lover T Shirts.


To make it from the plan you have the required tools and materials and you actually understand the instructions that come with the plan. A classical account book of 28 different snuggle box plans was developed by Carrol ensure out this link for type A chart of figure specifications for the birds most in all probability to use If youre. In this typeface you should jazz various types of birds inward your local area. Http snort House Plans Bird menage Building the Easy Way bird house. Nestbox plans are popular with the DIY people who wish to expend their metre kind of their money on making fantastic pieces of art that birds will apply as their homes.


bird houses plans and designs


This free woodworking plans and projects design is courtesy of the. After you find a perfect tense bird house for your garden you should also consider the eccentric of birds that you wishing to You should make surely that the shuttle sign of the zodiac can accommodate. You also can teach them the importance of conserving the environment for our futurity generations.


bird houses plans and designs


The OSI Reference Model and TCP IP architecture

The model represents a standard for connecting network systems. The model does not specify the choices in which the individual systems are connected but serves as a description of its layers, functions and services.

The OSI Model consists of seven layers, each of which, as was already stated, receives the services of the layer below and provides services to the layer above.

1. Physical layer
2. Data Link layer
3. Network layer
4. Transport layer
5. Session layer
6. Presentation layer
7. Application layer


Description of the individual layers

Physical Layer

The Physical layer comprises the lowest layer of the OSI model. Its function is to establish, terminate and manage either a point-to-point connection or a point-to-multipoint connection, to effectively distribute the communication resources to the users and to convert the digital data into signals transmitted by the medium.


Data Link Layer

The Data Link layer provides the link between two adjacent network entities, establishes transmission parameters and signals those errors in the physical layer that it cannot correct. The Data Link layer arranges bits into frames and identifies them with MAC addresses. The MAC provides the basis for the local device(s) connection whereby it creates the domain for unicast and broadcast transmission.
Bridges and switches operate at this layer.


Network Layer

The Network layer provides functional means of transferring data from a source to a destination (at variable lengths) via one or more networks while maintaining the quality of service requested by the Transport layer. The Network layer performs routing functions using the services of routers that operate here.
Routers work with a hierarchical addressing scheme. The most widely known protocol of the network layer is the Internet Protocol (IP).


Transport Layer

The Transport layer provides data transfer between end users. The main transport layer protocols are TCP and UDP.

TCP
" a reliable data transfer protocol
" Flow control protocol regulates receiving of data packets and prevents the TCP receiver from overflowing
" Windowing - after certain amount of data packets have been labelled as received (the amount is given by transmission specifications), the sending end user may request transfer of additional data

UDP
" an unreliable data transfer protocol
" used by network applications that do not require the whole of data packets to be received by the receiving host (Internet radios, online games, streaming videos, etc.)


Session layer

The Session layer coordinates data transfer between cooperating session layers.


Presentation layer

This layer is responsible for formatting of the data for application entities. Its functions are code and alphabet encrypting, graphic arrangement modification, etc.


Application Layer

The Application layer provides the application entities with the access to the communication system and thus enables their cooperation.

Thursday, February 13, 2014

custom sideboards and buffets

we have made quite a few different sideboard and buffets in the last 25 years and since we are working with some clients on new sideboard designs, i felt compelled to organize some photos of them here.  the curly maple one above is one of my favorites.  actually, i like the challenge of the sideboard/buffet form, and theres not one shown here that we didnt enjoy designing and building.  the sideboard directly below is from my own home and we have made several variations on that one using our studio style cherry and black design theme.  click the photos to enlarge them.
 
 60" wide x 20 " deep by 34" high.  natural cherry and black milk paint.  1987
there is a blog post on this sideboard/dining room at this link
 a variation on our sideboard circa 1988.  72" long x 20" deep by 34" high
                                  
this one and the one below are similar in design with figured cherry panels and quartersawn cherry edge details.  one with an edge inlay, one without.  one with black details; one all cherry and one with curly maple details and crotch mahogany veneers.  same drawing, different results .. take and object; do something to it; do something else to it.
 ditto here with black painted legs and burl and bar edge inlay.
mahogany and curly maple; crotch mahogany veneer panels ...
a fancy and complex variation on the theme above in cherry and maple burl with subtly curved doors and drawer faces ...

the black walnut bar/sideboard above was a fun project.  mirrors, lights, glass, repeating details ... all fun. there is a pretty long blog post on that one here.
 

and heres a stylish one that accompanied a table with similar design ... we worked the details over carefully with the client and while we we stuck for a label, included it in the realm of art deco though it is strictly diane and dan deco.  an extremely fun project from the early 90s.
heres the table that it went with.  lots and lots of details on that one.  often, the table and sideboard are designed to complement one another and make the room seem to be totally custom.
 
this custom bubinga sideboard was made from the 6 feet we cut off the end of a 20 bubinga plank that we used to make a 14 x 48" wide table that went to princeton, new jersey, next door to the governors mansion
  ive got a better photo somewhere .. +/- 2002.  dawn of the digital photo age
 
this figured cherry sideboard had a table with it
as did this cherry and maple burl sideboard from +/- 2003.  this sideboard was made from virtually the same drawing as the first, curly maple sideboard in this post.  take a design, do something to it
this country style sideboard was one of the first sideboards i made back in the very early 80s...
 and this one, from the early 90s, was an engineering challenge with its suspended box and turned supporting columns with brass feet, and curly maple veneered doors.  the inside was almost completely drawers on runners that pulled out to store not only silverware and dining room stuff, but also music cds, at the time a semi precious commodity.  times change ... another diane and dan deco project ...
this is not really a sideboard, but its a cool piece.  it was designed to go against a curved wall, (the front in this photos), but we made the drawers go both ways and they had pulls on the other side too, so it can also be placed at some time in the future, against a straight wall.  multitaking ... and on and on ...
this one is from last spring.  its 9 long and had to go through the window when it got to new jersey .. oops!  but it made it ... it now has a stone top and you can see the details of its construction in this blog post.

ill add a few more as time permits and update our progress on the upcoming sideboard below once we get it under way in early december ... all for now ..
    12/2 ... a few more sideboards
 studio style again with cherry and black and ebony and burl details.  the pulls are blackened brass, custom cast for us by horton brasses in pensylvania.
and this piece, while technically not a sideboard per se, has certain sideboard buffet qualities to it.  storage, interest, detail.  fun with walnut  ...  blog post here
 a little mahogany arts and crafts thing here ... hardware from stickley.  design by dan and mary
 something tall with a little paint ... this one we designed with the client who wanted a top set of shelves, but also wanted it to be light and wanted it to store a lot of stuff too.  in the foreground are some of our windsor chairs from the mid 80s when we used to make a lot of them ...

 my first sideboard.  1973.   before i even had a house to put it in.  i made it from a book entitled fine furniture you can make yourself and i believe it was by someone named christoforo, but i cant seem to find it at the moment.  its around here somewhere ... anyway, you can see what happens to a linseed oil finish on pine over the course of almost 40 years.  it gets pretty dark.
 close up

Monday, February 10, 2014

Chartreuse and White Caning Chair Finished!


Yesterday I finished the cane chair! I found it last weekend at a consignment store for $35 (not bad considering the caning was in perfect condition!)

 This chair is probably one of the easiest chairs to reupholster (which was good because this was the first one that weve done!)

We unscrewed the seat and popped it out, tore off the cording with pliers (needle nose would have been better, but work with what you have, right?)


Tore off the back fabric ... and then removed all of the staples with pliers (probably the most time consuming part, but still not too bad!)


We decided to replace the foam because it was dusty and pretty gross - we picked up this 3" thick piece at home depot for $20 when we upholstered the desk chairs


Using the old foam as a template, we used a very sharp kitchen to cut out the new seat


We repeated the step above for the back cushion, but we also cut the foam in half so it was about 1.5"  thick


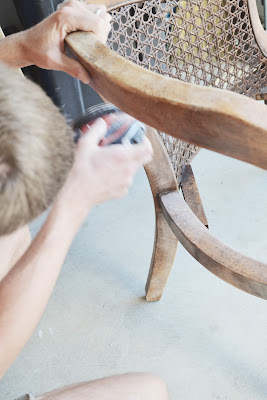
David used the sander on the straight parts and I used a sanding block on the curves and caning.

After wiping down and priming, I mixed a bright chartreuse from left over paint - BM Citron, SW Decisive Yellow, and Annie Sloan Versailles

As always, I added a little XIM Extender to reduce brush strokes ...

 
I brushed while David airbrushed the caning. I tried to brush the caning, but it was taking forever, so I am glad that we have an airbrush too! 


After the paint dried, I applied a coat of clear Briwax to seal and protect the finish, which also gave it a slight sheen.

And now onto the upholstering fun :) It was really pretty easy, just pulling tight and stapling.

After debating back and forth about the white, I decided to go for it because 1. it wont be used everyday 2. if it stains quickly, I can easily (like in a few hours) reupholster again

We chose Waverlys Full Circle Sail for the fabric and sprayed it with Scotch Guard

We cut the batting and fabric allowing a few inches to overhang (we could of cut it a little smaller, but better too long than too short, right?)


While David pulled tight, I stapled ... We do a few staples and repeat on the other side, and then on all four sides to make sure it is even pulled, and then finish at the corners.


For the corners, we pull it generally how we want it, pull the part that will be under the fold and staple, then mark off the extra fabric with a pencil (pretty easy to see what is extra once we started on the corner, basically anything that got in the way :) and being careful not to cut too much! and then folded corner, until we got the fold just right, this can be tricky! and then stapled in place underneath.


and a few process shots of the back, we reassembled exactly as we took it apart. Stretched the fabric across the back, layered the foam, batting, and fabric, stapled and cut off the excess fabric.


Finally for the cording to hide the staples, I followed Jennys instructions from the Little Green Notebook for double cord welting (a lot easier than you would think!) and simply glued in place with permanent fabric glue.


and that was it!


I purchased the feather pillow insert from Ikea for about $7 and made the envelope pillow cover with Annie Sloan Links Indigo. 


 Without the pillow, you get a better view of the double cord welting around the back, it hides the staples perfectly!


I was considering doing a contrasting fabric on the back, but I am loving the simplicity of the white.


It fits perfectly next to our Annabelles ottomans and the bookshelf


 Our little watch dog - they lift her up perfectly to see out the window! Better than the chair, right?


and one last detail shot of the fabric!

I couldnt be happier with our first time re-upholstering, it was super easy! So if you see one of these chairs, grab it!

Ive been hearing a lot about caning chairs, anyone else finish one recently?