Showing posts with label chair. Show all posts

Monday, February 10, 2014

Chartreuse and White Caning Chair Finished!


Yesterday I finished the cane chair! I found it last weekend at a consignment store for $35 (not bad considering the caning was in perfect condition!)

 This chair is probably one of the easiest chairs to reupholster (which was good because this was the first one that weve done!)

We unscrewed the seat and popped it out, tore off the cording with pliers (needle nose would have been better, but work with what you have, right?)


Tore off the back fabric ... and then removed all of the staples with pliers (probably the most time consuming part, but still not too bad!)


We decided to replace the foam because it was dusty and pretty gross - we picked up this 3" thick piece at home depot for $20 when we upholstered the desk chairs


Using the old foam as a template, we used a very sharp kitchen to cut out the new seat


We repeated the step above for the back cushion, but we also cut the foam in half so it was about 1.5"  thick
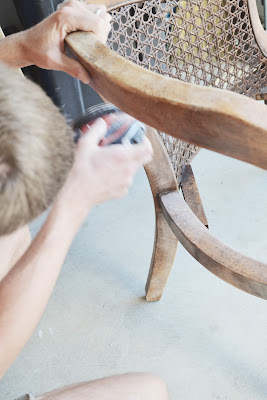

David used the sander on the straight parts and I used a sanding block on the curves and caning.

After wiping down and priming, I mixed a bright chartreuse from left over paint - BM Citron, SW Decisive Yellow, and Annie Sloan Versailles

As always, I added a little XIM Extender to reduce brush strokes ...

 
I brushed while David airbrushed the caning. I tried to brush the caning, but it was taking forever, so I am glad that we have an airbrush too! 


After the paint dried, I applied a coat of clear Briwax to seal and protect the finish, which also gave it a slight sheen.

And now onto the upholstering fun :) It was really pretty easy, just pulling tight and stapling.

After debating back and forth about the white, I decided to go for it because 1. it wont be used everyday 2. if it stains quickly, I can easily (like in a few hours) reupholster again

We chose Waverlys Full Circle Sail for the fabric and sprayed it with Scotch Guard

We cut the batting and fabric allowing a few inches to overhang (we could of cut it a little smaller, but better too long than too short, right?)


While David pulled tight, I stapled ... We do a few staples and repeat on the other side, and then on all four sides to make sure it is even pulled, and then finish at the corners.


For the corners, we pull it generally how we want it, pull the part that will be under the fold and staple, then mark off the extra fabric with a pencil (pretty easy to see what is extra once we started on the corner, basically anything that got in the way :) and being careful not to cut too much! and then folded corner, until we got the fold just right, this can be tricky! and then stapled in place underneath.


and a few process shots of the back, we reassembled exactly as we took it apart. Stretched the fabric across the back, layered the foam, batting, and fabric, stapled and cut off the excess fabric.


Finally for the cording to hide the staples, I followed Jennys instructions from the Little Green Notebook for double cord welting (a lot easier than you would think!) and simply glued in place with permanent fabric glue.


and that was it!


I purchased the feather pillow insert from Ikea for about $7 and made the envelope pillow cover with Annie Sloan Links Indigo. 


 Without the pillow, you get a better view of the double cord welting around the back, it hides the staples perfectly!


I was considering doing a contrasting fabric on the back, but I am loving the simplicity of the white.


It fits perfectly next to our Annabelles ottomans and the bookshelf


 Our little watch dog - they lift her up perfectly to see out the window! Better than the chair, right?


and one last detail shot of the fabric!

I couldnt be happier with our first time re-upholstering, it was super easy! So if you see one of these chairs, grab it!

Ive been hearing a lot about caning chairs, anyone else finish one recently?

Thursday, February 6, 2014

Adirondack Chair Part One


A good friend and previous customer ordered her second Adirondack chair and I thought I would take some step-by-step photos as I started the project. Maybe this will be helpful for those who haven’t tried to build one of these great chairs, or is curious about how they go together. My design is a modified version of Tom Begnal’s chair from Fine Woodworking. I have made some subtle changes with each one I build, mostly with the seat slates and the arm shape/width.

 Chair parts cut and ready to assemble

First I cut the parts required for the chair. Having built a number of these, I have a set of templates made of hardboard to speed up the layout of most of the curved parts.


Chair base complete

Take the two sides and attach the front seat slat, drill and counter sink the holes. I use waterproof glue and stainless steel screws and bolts in my chairs.  Once the front seat slat is installed, and the lower cradle and attach the same way you did the front slat.


Glue the leg assemblies now, I find this easier than bolting the chair to the body and then trying to add the arm support parts. Again, SS screws and waterproof glue. I drilled the holes for the arm attachment later in the process.


Clamp the front leg assemblies to the base. Mark and drill the bolt holes to attach the front legs. The angle of the chair is determined by the cut on the bottom of the sides so when you lift the front, it will be clear where to drill the holes to attach the legs. Quick clamps help out here.


Front legs bolted to the chair frame with 3/8” SS bolts, washers and nuts. Next step is to prepare the back risers.


Determine the angle to cut the back risers. This is where the upper cradle attaches and determines the slant of the chair back. In this case the angle is 25*. Anything less and the back may be more upright, more and the back will lay back. A personal preference, but this angle seems to be most comfortable.


Attach back risers in the same manners as the front legs. Glue prior to bolting the risers, unlike I did the first time I bolted these to the sides :) 


Add a temporary spacer at the top of the risers to get the proper spacing for the upper cradle. Drill and countersink the holes for the cradle and attach with glue and screws to the top of the risers.


Completed base assembly
The base is now complete. All of the back slats and seat slates have been cut, sanded, and ready for the finish. This chair will receive 2 coats of Porter Paints exterior latex enamel. In the past I have either brushed or sprayed the paint after the chair is complete. I found it very difficult to get into all the tight spots after so this time I am going to paint everything before attaching the slats and arms. Look for the results in the second part of this post. You can see the templates I mentioned earlier on the right edge of the photo.


Friday, January 31, 2014

Kentucky chair woodworking plans

Get Kentucky chair woodworking plans

Kentucky Chair Woodworking Plans

Kentucky.gov business, Kentucky.gov partners with the commonwealth of kentucky to deliver applications, websites and online services.. Kentucky department for workforce investment, Workforce investment connects kentucky to employment, workforce information, education and training. there are services for all. Kentucky: kids health - home, Do you have other questions regarding your children's health? click here for links to more information and services. for links to additional state and national.

Kentucky transportation cabinet - official site, Contact information kentucky transportation cabinet 200 mero street frankfort, ky 40622 map it motor carrier, vehicle licensing/titling, and driver licensing information. Kentucky: cabinet for health and family services - overview, As part of state child welfare activities, the department conducts regular self-evaluation of it's service delivery and plans for service improvement.. Artisan center - gallery and shops, Official state government website of the kentucky department of travel. here you will find everything you need to make your trip to kentucky enjoyable, easy and friendly..

Kentucky: cabinet for health and family services - overview, The division of child care supports quality child care through programs and plans that promote the improvement and expansion of statewide child care services and. Mission style queen bed woodworking plandesign -design, Mission design bed displays traditional mission style with a special touch that will add its distinctive style to any home for years to come. this bed features 3/4. furniture-ology, We love a challenge and when it comes to furnishing and decorating our home it is no different. there are only a handful of items in our home that we have purchased new..