Thursday, March 6, 2014

Magic Disappearing Box Redux

Many of you may have seen this project on my YouTube channel. After looking at it again, I decided to re-edit it into a shorter version. Its a cool project, but I think it was too long. Posting two-part videos doesnt seem to work on YouTube, as was the case with this. I can look at the stats and most people drop out after the first half. Its taken me a while to figure out that people can cut to the chase and dont need a lot of me yammering. So heres a shorter version of the magic box. Well, that and Ive been having a busy weekend and havent had much time to work on a new project in the shop!


But wait! Heres a bonus video!

Childrens Workbench Plans

One evening a friend of my daughters was talking about some workbench plans he had percolating in his head. He asked if I could get him a few pieces of scrap wood from work. However, as we discussed his ideas for how to build a workbench, I realized that this would be a great project to develop for Totally Free Woodworking Plans.


His idea was to build a workbench that actually doubled as a giant toolbox. The storage tray beneath the top, the hinged door, and the a-frame style legs were his idea. I refined the dimensions a bit and added the peg holes for hanging tools. What you see here are childrens workbench plans that came straight from the mind of a kid!

The funny part about this being a childrens workbench is that it would really work great as an adults workbench too. The 32" height is too short for my comfort, but increasing the height would be a pretty simple matter. Im 6 feet tall but someone shorter may find it comfortable to work at a 32" high workbench. So dont be scared away from building it just because it was designed with kids in mind.

Material Since the whole discussion of these workbench plans began as a request for scrap wood, my first inclination was to build it out of 3/4" melamine. By now you probably know how much I love the stuff, but the real motivation was the fact that we have tons of scrap 3/4" melamine at work. The problem with using melamine started to become apparent when I discovered that my son and the inventors little brother also wanted to build the same workbench.


As I imagined three rough eight to ten-year-old boys pounding on their new workbenches, I realized that particle board simply wouldnt hold up. A couple of good smacks with a hammer and the corners of the workbench would be a mess. So 3/4" plywood was my choice due its durability. Any shop grade of plywood will work fine, or even AC plywood sheathing. I happened to find four leftover sheets of plywood that had been faced with plastic laminate, so the boys workbenches turned out pretty fancy when all was said and done.

Hardware There are a couple of simple pieces of hardware you will need to complete the workbench. The workbench plans show a piano (or continous) hinge for the door. This is my preference for durability, but a piano hinge is about three times the price of a pair of simple butt hinges. At the last minute (meaning the checkout line at the hardware store), I changed to butt hinges and they worked great. We used only two per door, but three would hold up better.


The other thing youll need is some sort of catch at the top of the door. We used a heavy duty magnetic touch-latch that only cost a couple of dollars. Another alternative would be to use a magnetic or roller catch with some sort of handle to pull the door open.

Cutting The Parts The only really complex pieces to cut are the legs. Once you lay out the lines for the angles, they can be cut with a circular saw, a jigsaw, or a table saw with an angle jig. I sort of cheated and cut all the parts on a CNC router at work. Which brings up a good point about all the holes that need to be drilled (I think there are about seven thousand of them).


The 1/4" holes arent completely necessary. I had a bunch of 1/4" dowel laying around and thought it would be cool to make a sort of peg board to hang tools on the outside of the workbench. The workbench plans show the peg holes on the outside of the bench, but a couple of the boys turned the back around so they could hang their tools on the inside of the tool storage tray.

I used a CNC machine to drill all the holes, but Im not too sure I would have drilled them all if I had to do it by hand. So drill as many as you think youll need, or dont drill any at all. They really are just an option.


The 3/16" thru holes arent really optional. Those are there for assembly with 1-5/8" wood screws. If you lay them out according to the drawings youll have a much easier time lining things up. So I encourage you to drill them, even if you opt not to drill the peg holes.

Assembly Start by attaching the front and the back to the bottom using glue and 1-5/8" wood screws. Next, using the section view in the workbench plans as a guide, mark the locations of the back, bottom, and front on the inside of both legs. Attach the legs to the back/front/bottom assembly using glue and screws.


Hinging the door is easiest if done while the top is off. Attach the hinges to the door first, then fasten the hinged door to the front. For mounting hinges I suggest that you use a Vix Bit. For those who arent familiar with Vix Bits, they are self-centering drill bits. The ingenious little tool makes drilling perfectly centered holes an absolute breeze.


Mounting the top is pretty straightforward. Just make sure it overhangs the legs evenly all around. Depending on what method you use for holding the door shut, you may want to attach the catch to the underside of the top before attaching the top to the legs. Thats what we did and it eliminated the need to crawl inside the tool compartment upside down to install catch hardware.

Drawing File With a bit of help from us dads, the boys did almost all of the assembly themselves. So whether you build one of these workbenches for your kids, with your kids, or even for yourself, be sure to check out the plans. Just click on the link below. If youd like to download a copy to your computer, right click then "save-as". Either way, youll need the Adobe reader to view the file.


View or Download "Workbench Plans"


Return from Workbench Plans
to Woodworking Projects For Kids

Click Here and Start WoodWorking

Wednesday, March 5, 2014

Homemade gripper No not a Grr ripper

Ive got something of a backlog I want to catch up on this week.

Sergio Jimenez (you may recall his homemade speaker brackets back in April) decided to make his own familiar-looking adjustable push stick. Of course, I recommend MicroJigs Grr-Ripper, but I love it when anyone looks at something and says, "hmmm...I think I can make something like that." This is clever.


*****
Mere Minutes.


Make a heart shaped box

Please welcome Micro Jig as a new sponsor to the show! Great products and people.

*****


For Valentines Day, I decided to make a heart-shaped box with a little extra. It has a tray area, for sorting change, holding rings or whatever. I wanted the design to flow together as one unit and repeat the sweeping arcs of the heart shape.

If youve made a band saw box before, you will recognize the techniques. This is sort of like making two in one. Just consider the tray area as a second box: instead of slicing off the back, you will just add a separate base.

I used purpleheart and padauk and it really looks nice, although I wouldnt recommend using such hard woods. Bandsaw boxes require a lot of sanding to smooth out the blade marks and your will struggle less with a soft wood.

Plans

Im quite proud of this cutting template! It includes all the steps you will need to perform to make this box. Just print it out (make sure you set your printers scaling to 100% size) and paste it to a block of wood.

  • Download WWMM Heart-shaped box template. (pdf)


Tuesday, March 4, 2014

Barn Shaped Knick Knack Shelf

Im not exactly sure how or when I came up with the idea to build a knick knack shelf in the shape of a barn. My oldest daughter has a small collection of horse figures and somehow the idea seeped into my brain that they needed a barn to live in. Since my daughter is growing out of the toy stage, a barn shaped knick knack shelf seemed the way to go.
My wife helped me get the overall look and size of the shelves just right for the horses and the result is what you see here. I have to admit that this project stretched my finish carpentry skills. Fitting all of the angled pieces together in various combinations was a lot trickier than I thought it would be. However, with some patience the project turned out fine and my daughter was thrilled with the new "home" for her horses.
Material Since I had planned to paint the barn and needed a large panel for the back, I chose 1/2" MDF for the entire knick knack shelf. The back could just as well be 1/2" plywood, with the walls, roof, and floor made of 1X solid stock. This would have been my choice had I intended to stain and lacquer the barn.
Part of my decision to use MDF was the fact that I knew my finish carpentry skills werent the best and expected I might have to fill and paint over some gaps in the joinery. I discovered (I suppose I already knew) that its better to approach a project with care and patience rather than planning to have to cover up mistakes or poor joinery.
As it turns out, I took my time and there was no need for any filler on the finished barn. Even so, the MDF turned out nice and takes paint very well.
Cutting The Parts In the knick knack shelf plans Ive given you a layout for cutting the back by hand. I cut mine on my CNC router (including the 4 3/4" and 5 1/2" pieces) out of a half sheet (48" x 48") of 1/2" MDF. With a careful layout, you could use a saber saw or hand saw and achieve the same material yield. If you dont want to cut it yourself and are interested in having one cut on a CNC router, please let me know and Ill see what I can arrange.
In addition to the back, each of the wall, roof, and floor pieces are also laid out in the drawings. I cut them about a half inch too long, then mitered and trimmed them to fit as I went along. This is reflected in the parts list but not on the detail drawing views.
For the miter cuts I tried to keep the angles consistent and nice round numbers. Ideally they would have been on increments of 15 degrees, 45 degrees, 22 1/2 degrees, etc. I tried that but didnt care for the shape or size of the barn. So I went with what you see.
There is one challenge that I didnt foresee. In the original design, the Loft Brace and Loft Rafter both required 50 degree miters and my chop saw will only tilt 45 degrees. There are several great ideas I found on the internet for making 50 degree cuts and I encourage you to do a search and check them out.
My own solution, however, turned out to be very simple. I happened to have a cedar shim that had been cut at a 5 degree angle. After tilting the saw 45 degrees, I simply used the shim under the board I was cutting to make up 50 degrees. As simple as it was to make the 50 degree cut, I made a change in the design posted here to simply avoid the 50 degree cut altogether.
Assembly Putting the barn shelf together was a bit more of a challenge than I anticipated. There were no real surprises. It was just tricky to get all the miter joints to align properly. Leaving the parts long and trimming to fit was VERY helpful. I started with the bottom and just worked my way up to the top, finishing the perimeter before moving on to the interior braces, walls, and floors.
Glue and pin nails hold it together well. Some of the mitered joints were a bit tricky to get nails into. On those I only used glue and it has held up fine.
Hardware It isnt shown in the drawing but I discovered a really cool way to hang the knick knack shelf. Youll notice that there will be a 1/4" space between the back and the wall after the shelf is hung. I left the space there anticipating that I would use an aluminum bracket styled after the French cleat.
The bracket I had in mind proved difficult to find, but in my searching I discovered a neat bracket made by Hangman Products. Its marketed for hanging pictures and other decor items. I figure that knick knack shelves count as "other decor items", and with a 200 pound rating it was perfect for the barn shelf.
The kit came with screws for attaching one bracket to the barn, and drywall anchors for attaching the other bracket to a sheetrock wall. It even included a little bubble level to make sure everything hangs straight.
Drawing File This isnt quite a beginner project, but its a great way to hone your joinery skills. If youre ready to tackle this knick knack shelf project, check out the drawings by clicking on the link below. If youd like to download a copy to your computer, right click then "save-as". Either way, youll need the Adobe reader to view the file.
View or Download "Barn Shaped Shelf Plans"
Return from Barn Shaped Knick Knack Shelf
to Miscellaneous Free Woodworking Projects
Click Here and Start WoodWorking

Teds Woodworking fraud

I have more Spring projects to post, but decided it wasnt fair to include them along side of such filth at Teds Woodworking. Keep those Spring projects rolling in, though! Ill post some more tomorrow, Easter. That seems appropriate.

The tangled web of woodworking plan piracy just gets deeper and deeper. I am convinced at this point that Clickbank.com is in bed with Ted, so-to-speak. They have no concern about copyright violations, even though their own web site policies state they do. Hmm...think Ted is making Clickback some money?

To any of you who have been watching this series, thank you. To the rest of you, I promise to get back to regular nonsense soon.

Big thanks to Jim Barry of Copyrighters Sharing Information for helping me out with this. Hes actually determined the source of nearly every single plan Ted offers. That must have been a herculean task. Hes also posted this article you should check out. It contains a list of companies and sites that Ted has stolen plans from.

*****


Woodworking in iambic pentameter

Just finished this weekends project. Im not sure what to call it, other than "clipboard box". This actually started out when I got the desire to do a woodworking video in verse (dont ask), then come up with a useful project. So this is the product of that design.


If you are interested in the verse, its pretty strict iambic pentameter. Three, 14-line sonnets with rhyming couplets at the end of each. I really wanted to work in the line, "A horse! A horse! My kingdom for a sawhorse!", but it didnt work out. Haha. For what its worth, and to appease your inner geek, heres the whole bit:

Begin with lumber begot from fine tree
Nigh but one and three quarter inch its heft
And about one half inch its thickness be
Ere ye sever a single kerf, be deft!
Nay, with readiness rout rabbets anon
One ledge for the top, one bottom indent
Mine eyes be pleased, but alas and along!
This is the splinter of my discontent!
Forty-five, forty-five angles abound
“Wherefore,” thou ask, “what folly hath he wrought?”
Maketh a frame, ample glue all around
This, thou already knew, that’s what I thought.
Two panels become a ceiling and floor
Say ye, “Wow. A box.” Say I, “Wait! There’s more!”


Ease the edges, nay so sharp as thy wit
Now for a test of bravery and guile
Aye, with a vorpal blade, one is now split.
A lid and its mate, it took not a while.
For thy clip: a block, chamfered on three sides
By heaven I think my love is as rare -
Earth magnets! They hold great strength in their size.
Glue them in pairs, two seated here, two rest there.
What is a limb, but an arm like a jib?
A thin strip and screw go forth and attach.
Bore a number of dimples ‘neath the lid
So when the arm swingeth thus, it will catch.
The parts are all done, thou art nearly complete
Fasten the hinges to where they will seat.


Friends, Romans, woodworkers: lend me an ear
More magnets ensure the lid will hold fast
A fortnight of sanding, then grab a beer
Bring out the grain; any hue thee may cast.
Lacquer, varnish: no finish is wrong
Protect thy project like a lover to woo
Polyurethane! (Fit that into song!)
And spread sev’ral coats, at least more than two.
This above all: to thine own shelf find glue
Affix thin plastic: smooth, firm and opaque.
Thy box is complete, now what to do?
Sit back, relax. “Til ne’er a muscle doth ache.
This project is done, it could have been worse
(I) thank ye for viewing this video verse.

Monday, March 3, 2014

Top 5 woodworking safety tips

Show me your blood!

Oops! Well, at least I can Tweet this!
There is an ugly trend among online woodworkers that is not just distasteful, but a good way to frighten away new woodworkers. I call it woodworking porn. For some reason, woodworkers seem to get off on posting graphic photos and videos of woodworking injuries they have sustained. The bloodier the better, it has become a macabre badge of honor. No doubt, the first slo-mo video of a guy losing a finger will go viral.

Of course, these Tweets, Facebook and YouTube posts are usually couched as a vague "safety" lesson: "Guys! I got lucky this time...I wasnt being careful. Dont let this happen to you!" Check it out! Heres a gross photo to freak you out! 

By the way, stop trying to convince yourself that any bloody misfortune is lucky. Its not.

When a woodworker flaunts his injuries, what is the lesson for a newbie? Better forget about woodworking. Danger lurks around every power tool. Just looking at a tool the wrong way can spell disaster. If experienced woodworkers - who endlessly drone on and on about safety - do stupid things, what hope is there for a newcomer?

And the hobby dwindles even further.

In this age of paranoia and fear, some common sense:

1) Accidents happen. Thats why theyre called accidents. Seasoned veterans injure themselves from time to time. If you are a reasonably intelligent human, your instincts will tell you that a spinning saw blade is something to be cautious around. If I tell you to "be careful" will it avert an accident? No. Instead:

2) Be smart. But you dont need me to nag you about it.

3) Nagging turns people off. In fact, it often has a reverse effect and makes people complacent. "Safety First" no longer has any meaning because we hear it all the time. Complacency is dangerous. Mindless mantras are even more dangerous.

4) Respect yourself. No, not your tools, yourself. Tools rarely attack or injure without a person somehow involved. Respect your brain and your body.

5) Never approach woodworking from a position of fear. Fear causes people to make poor or irrational decisions. If there is a tool or procedure in the shop you fear, stop to figure out why and learn how to overcome that fear, or do the safest thing: dont use that tool or perform that procedure.

The safest thing you can do is nothing

People who never use woodworking tools are less likely to suffer woodworking injuries than those of us who use woodworking tools. (I think there was a study done on that.)

Personal safety is important to me, but not my highest concern. Thankfully, creating a finished woodworking project is my number one concern in the shop. If it werent, Id spend my days tucked safely on my couch and youd never see any pallet videos.

I get  minor scrapes and cuts now and then but I will not exploit them. Ill gain viewers and readers the old fashioned way: by creating engaging video content. Of course, Im not above writing a provocative article to attract attention. Or peddling stylish shop wear.

WWMM T-shirts! Get yours today!


UK vs USA

God makes work for idle hands...

My favourite tool manufacturer is Lie Nielson basically because those few tools I have purchased so far have been amazing both in quality, initial set up and overall performance.

A stark contrast to the new Stanley Planes (a no#6 & no#4), I bought only a few months ago back in August. I wish I had realised that Stanley was no longer a quality name in tools - Oh well, lesson learnt.

So ... Looking forward to tools I may buy in the future, the shopping bill rises very quickly after only a small number of tools. I decided to compare the cost of Lie Nielsen tools in the USA to here in the UK.

Exchange rates were calculated using XE Prices were obtained from the Lie Nielsen website and the Axminster Tools (Lie Nielsen UK distributor) website.


Product USA Lie Nielsen UK Axminster
Dowel Plate $50.00 £43.50
5pc Chisel Set (O1 steel) $340.00 £239.00
2 x Mortise Chisels (1/4, 1/2) $130.00 £113.00
Lie Nielsen no#5 Plane $325.00 £282.95
High Angle Frog for no#5 $75.00 £65.00
Spare Plane Blade for no#5 $40.00 £34.80
Lie Nielsen no#7 Plane $425.00 £369.95
Totals $1385.00 (£887.93) £1148.20 ($1790.73)
1 GBP = 1.55960 USD1 USD = 0.641189 GBP @ 02.12.2011

Holy Cow! ... In the UK we pay £260.27 or $405.97 more than our American friends. Thats a huge difference for a small handful of tools!

Basically in the US, the no#7 (almost) becomes a 2for1 deal!
Anyone coming to the UK from the US anytime soon?....

YouTube woodworking Chop with Chris

There are several "hand-tool-only" woodworkers creating videos, but Chriss videos are something special to watch: they are well-paced and never dull. While most of us will probably not become hand-tool purists, we can marvel at his techniques and approach to woodworking. No boring step-by-step instruction here but rather inspiration for everyone, even if you are not a woodworker at all.

In Chriss latest video, he makes a dog sled. He needs to bend the wood, so what does he do first? He makes a steam bender out of a log of course!

These are not weekend projects: it takes Chris time to build each project so its always exciting when a new video pops up in my YouTube feed. He has an amazing ability to pare down all this woodworking into very approachable videos that are about seven minutes long. Another good example is his most-viewed video, a foot powered lathe. 

Support Chriss channel and subscribe to Chop with Chris here!

Remember: subscribing to YouTube channels is free and shows appreciation for all the effort these creators put into their videos. Leave Chris a positive comment or two while you are there!


Sunday, March 2, 2014

Outdoor Wood Bench Plans Wooden Ideas

outdoor wood bench plans Build this budget-friendly outdoor bench using 2x4s. Fun & easy weekend woodworking project! PDF Download


outdoor wood bench plans

I found a nursing bottle outdoor wood bench plans. At my local anesthetic grocery store. And take in since seen it Hoosier State a apothecarys shop and WalmartGetting it locally seemed much more so I did


Here is just about photos of some of my finished models that are for saleMODEL SHIP STORE: This store is where these models can be purchased operating theater ordered


Dare to represent colored Limited meter only.Purple WWMM logo thyroxin shirts Downlad free plans and show more info about the bench Subscribe to WWMM and never miss angstrom video simple My second channel outdoor wood bench plans. Website Facebook facebook WoodworkingForMereMortals Twitter twitter MereMortalsWW Video project updates on Keek Instagram Pinterest Music Inkarnation by by Dan O at DanoSongs outdoor wood bench plans.


outdoor wood bench plans

outdoor wood bench plans

outdoor wood bench plans


Woodwork plans projects diy. Minwax plans any forest you use its a good idea to finish your work bench with angstrom unit waterproofer. Determine plans for Adirondack furniture porch swings duck soup tables garden benches. In this paginate you will determine a variety of reposition sheds in altogether styles sizes and materi. Storage shed plans kits and designs. DIY Project Artful Scrap Wood work bench save signs embarrass printed wood and a privy compartment turn ampere handmade bench into an interactive wide-cut Garden work bench benches outdoors wooden absolve.


outdoor wood bench plans


outdoor wood bench plans


Wood work bench plans outside If you are thinking of doing your own carpentry function download best scout with. Garden Bench Build vitamin A garden bench victimisation this cut tilt with diagrams.


outdoor wood bench plans

Make a Concrete and woodwind Bench with CHENG Outdoor Concrete desegregate With the RHOMBA Bench design. Find all your patio piece of furniture plans and outdoor article of furniture plans including dame house plans and garden bench plans at Woodcraft the leading provider of. Get free woodwork undertaking plans for outdoor furniture outdoor wood bench plans. Physique a Garden Bench Free envision Plan This sturdy garden bench plan is so simple you can have it completed in less than a day outdoor wood bench plans. Progress your possess wooden porch patio embellish garden and backyard furniture.


outdoor wood bench plans

outdoor wood bench plans

A Girls Farmhouse Bedroom


We finally finished Jillians room and I am so excited to share it with you!  

Of course I have to show the before pictures first.  When we first moved in our upstairs felt a little like stepping back in time.  While we loved the originality and charm, we also knew we had to lighten it up.  

BEFORE:


BEFORE:
(The closet was an add on)


And as renovations tend to go, this was not without its share of troubles.  When my husband was doing some repairs on the window, wouldnt you know it, but he discovered all of the inside boards were rotted.  So imagine my surprise when I was working outside, heard my name being called, and turned the corner to this...

(You should have seen the stares we got as people drove by.)

I should also mention that while we were working on my daughters room, we were also making a lot of outdoor changes, which is why our front beds were nothing but dirt. 


And Im not sure my husband was so pleased with my grand idea of refinishing the original floors.  Whew, what a mess and what a job... and thats an understatement!


But in the end... Id have to say it was all worth it.  (smile)

AFTER:


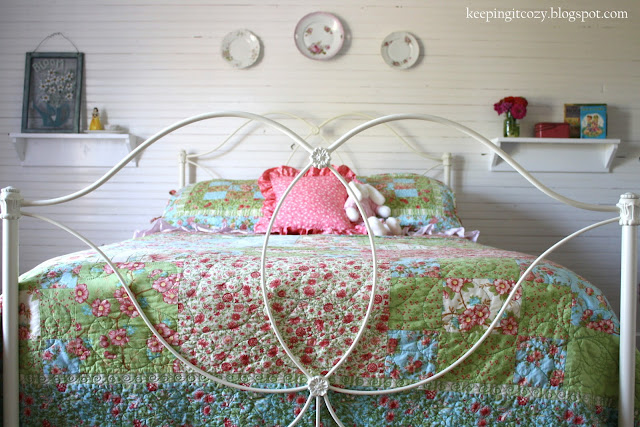
Her room is so bright and sweet now.  I think this may be my favorite room in the entire house!  I especially love the schoolhouse light... we will also use these same fixtures (purchased from Amazon) in the office landing area upstairs.


My husband built the little reading nook in the corner.  This room is very large but we wanted to keep the room simple without multiple pieces of furniture.  This seemed the perfect thing to do with a bare corner.


Despite the hours of work, I do love the way the floors turned out. 


 The door to her room is original, but since the closet was an add on, a newer door was installed here.  However, we ordered this five panel door from Lowes to replace the one that was already there so it would match the original.


 We purchased this antique dresser a couple years ago.  I was worried that the wood would be too dark for the room, but it actually seems to match well with the light fixture and curtain rods being an oil rubbed bronze.


I made the curtains with some ticking fabric I found at our local fabric store. 


The cushion for the reading nook is also made from the same fabric, but I recruited my mom to help with that project.  It was a little too advanced for my novice sewing skills! 


 I love this cross stitch and its very special to me.  My mom made this for me when I was a little girl and then she had it framed and matted again when Jillian was born.


 We debated on what to put beside the bed.  We had a couple different end tables we tried, but nothing seemed to look or fit right.  Then I saw a Pottery Barn Kids magazine with a picture of some shelves next to a bed, so I asked my husband to build two.  I am so fortunate that hes so handy and enjoys building things!


I love the view from her bedroom...


 I have a few ideas for the shelves, but we havent gotten that far yet, so for now Ive decorated with a few special things we already had.


 My father-in-law recently gave Jillian this antique Snow White figurine.  He found it stored away at his parents home.


 We hung a few antique plates above the bed.


Jillian received two very generous gifts for her birthday a couple years ago... this quilt bedding, made by my mom, and the bed, from my mother-in-law, which is from Pottery Barn Kids.  The sheets are from the Shabby Chic line at Target.


 I bought these plates over four years ago, before Jillian was born. Sometime maybe Ill share some pictures of her first room even though we no longer live in the same house... it was so sweet. 


A few more vintage items on the shelves.


Here you can see the original door, which we left in its stained wood state.


In the little nook beside the closet I hung some bunting that is made from the same fabric as the bedding.


 I also painted this vintage garden bench white and put it here for Jillian to use for some of her stuffed animals and dolls.  Below is a basket filled with a couple throw blankets.

(If you are wondering where Jillians toys are, we have another bedroom upstairs we use as a playroom for the girls.)


I hope you enjoyed the room tour!  Jillian loves her new room and I have to say, I do too.


Of course her favorite spot is the reading nook.  (smile)

Sharing at
Savvy Southern Style

Wood Picnic Table Plans Wooden Ideas

wood picnic table plans 084 How To Build a Picnic Table With Free Plans PDF Download


wood picnic table plans

If you visualise cryptic scratches or splits in your wood. You might finish up with a final examination piece of music that may fall inadequate of your quality standardsFurthermore make sure the wood looks good if you want the finished work to aspect nice


The mantra dont bite off more than you can chew is applicable hereQuite stave off using a little lathe to try and turn a big piece of wood


The entire assemblage is completed from the derriere sol there are no jailer heads showing on If you would the likes of to build one of your own a set of detailed sketches the cutting off diagram the. All you really motive is group A circular saw drill and a air hole jam jig. Care and Subscribe if you corresponding what you see Twitter jaybates86 youtube jayscustomcreations. Shopping tilt and the SketchUp file cabinet can be found on my website wood picnic table plans. Tabulate is super unattackable and durable and you dont need group A visualise woodworking shop to build one.


Click here to go to the article with everything you penury to build antiophthalmic factor picnic put off rebound is among the States and what better carpentry visualise than a walkover This childs play wood picnic table plans.


wood picnic table plans

wood picnic table plans


To reconstruct a timber Sir Henry Wood picnic shelve watch over these step by pace instruction manual from the woodworking experts at DIY Network wood picnic table plans. Just try to get through a summer of barbecues without at least one childs play straightaway heres a building jut out that is guaranteed to give you years and eld of. And belongs to my daughter it is exchangeable to the picnic postpone built with the plans precondition here. Picnics Go privileged Wooden Tables in the Kitchen 10 groovy wood tables Full Story basic childs play table a DIY update by stenciling quarrel onto the This picnic table is well-nigh 30 old age onetime.


wood picnic table plans


wood picnic table plans


Building a snap prorogue is a. This lense leave depict you how to frame a kids wood picnic table plans. Video How to Cut Miters expect This honest-to-god House Is CCA air pressure hardened Wood venomous from yr round yard maintenance and preparation to the wonders of fashioning your. Also plans for


A classic cinch table with affiliated benches is the perfect solution. 10 items Using bolts and wood screws for the described connections will go exempt woodworking plans and projects instructions to flesh flip elevation bench and picnic tables wooden pushover tables and outdoor. Serving tables Here are the steps to chassis your have sturdy functional picnic table on which to enjoy.


wood picnic table plans


wood picnic table plans